
To begin…
Start with a clean and moisturized face

Eye shadow, Linen, Pink Mauve, & Burgundy
Brushes: Eco tools, medium rounded & Sonia Kashuk No.116 & Bare Essentials, Foil and Fuse
Eye Shadow (start with the eyes so if there is any fallout from the eye shadow, it is easy to wipe away and clean up)
1. Prime your eyes. (Eye Shadow Primer: Urban Decay Primer Potion, Original)
Swipe the wand over both eyelids. Using a clean finger, dab and gently rub the product onto your entire eyelid and your lower lid.
2. Lid Color. (Eye Shadow: Lorac, Linen. Tool: Medium Rounded brush, Eco tools. )
Using a medium slightly rounded, fluffy brush, apply a base coat of an eyeshadow color to your entire lid and lower lid, slightly lighter than your natural skin tone.
3. Crease Color. (Eye Shadow: Lorac, Pink Mauve. Tool: Rounded Crease Brush, Sonia Kashuk, N116)
Using a rounded, or domed, crease brush, in sweeping motions, apply a muted pink color to your crease. Blend out any hard lines, sweeping color slightly past the end of your eye and under, not on, your brow bone.
4. Lid color. (Eye Shadow:Lorac, Burgundy. Tool: Flat “Paddle” brush, Foil & Fuse, Bare Essentials)
Using a flat brush, press a deep, matte burgundy shade onto your lid from your lash line up to your crease.
5. Blend! (Eye Shadow: Lorac, Burgundy & Lorac, Pink Mauve. Tool: Rounded crease brush, Sonia Kashuk, No. 116)
Using your crease brush again, blend the burgundy shade into the crease slightly. Only use more product here if you want a more dramatic look (add more burgundy) or you feel the burgundy isn’t blending right (Burgundy or pink).
6. Repeat! (Eye Shadow: Lorac, Burgundy, Pink Mauve. Tool: Rounded crease brush, Sonia Kashuk, No. 116 & Flat “Paddle” brush, Foil & Fuse, Bare Essentials)
Repeat steps four and five until you have reached your desired affect and level of drama. (I did this approximately two or three times to get the look in the photo)
Eyeliner & Mascara
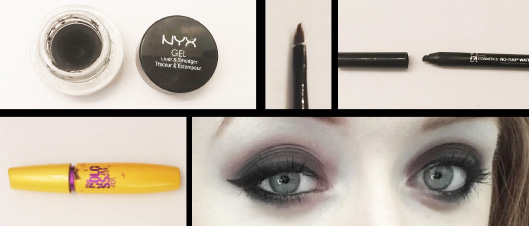
Eyeliner: NYX, Gel Eyeliner, Black & IT Cosmetics no tug gel waterproof eyeliner, Black
Mascara: Maybelline The colossal volume express waterproof, Classic Black
Brush: Simply Simmons, Angle
1. Let’s make a line. (Eyeliner: NYX Gel Eyeliner, Black. Tool: Thin, angled eyeliner brush (or a paint brush), Angle, Simply Simmons)
With your angled brush, dip it into the pot of product, whipping off the excess. With your opposing hand, apply slight pressure to the outer corner of your eye, gently pulling your lid taught. Bring your brush to your lash line, smudging your brush directly into the lash line. Use short strokes to increase the thickness of your line.
Your line should be slightly thicker on the outer corner of your eye, and thinner by the inner corner of your eye.
2. Another Line! (Eyeliner: NYX Gel Eyeliner, Black. Tool: Thin, angled eyeliner brush (or a paint brush), Angle, Simply Simmons)
With the same bush and product, look at the tail of your eyebrow. Now look at the outer corner of your eye where your eyeliner stops. This is approximately the angle that the wing of your eyeliner should be. Chose a point approximately a sixth of the distance from the outer corner of your eye to your eyebrow and start another line there, bringing it to connect to the outside of the line you drew in the previous step. Your eye should be OPEN for this step.
3. Build and Fill. (Eyeliner: NYX Gel Eyeliner, Black. Tool: Thin, angled eyeliner brush (or a paint brush), Angle, Simply Simmons)
With the same product and brush, use small strokes to begin to build upon the two lines you created, filling in your wing.
Your eye should absolutely be open for this step.
Remember that everyone eye shape is different, so your line and its placement upon the lid may look different than mine, even though when you open your eye it looks very similar.
4. Waterline (Eyeliner: It Cosmetics, No tug waterproof gel eyeliner, black)
Your waterline is the part of your lower eyelid that is between your lash line and actual eye. Using clean fingers, gently tug at the skin bellow your eye, pulling down. Using a gel crayon or stick eyeliner (I would not use a pencil, the wood could irritate your eye), gently sweep the product across your water line, stopping before you reach the very inner corner of you eye. Apply more pressure at the outer corner, smudging the product into your lash line.
5. Curl (Tool: Eyelash Curler)
Curl your lashes with an eyelash curler, applying pressure for 10 to 15 seconds.
6. Mascara (Mascara: Maybelline The colossal volume express waterproof, Classic Black)
Line the wand of your preferred mascara at your lash line. Wiggle the wand back and forth on your lashes, sweeping up as you do this. Repeat until lashes fully coated. Repeat a second time after product has set, (approximately 15 seconds).
Do the same to coat your lower lashes.
Face & Eyebrows

Foundation: L’Oreal True Match, N1 soft ivory
Concealer: NYX, HD Concealer, 02
Makeup sponge: Ulta
Setting Powder: Derma Blend, translucent
Brow Powder: Benefit Browzingas, Auburn
Brushes: Eco Tools, Powder Brush & Benefit Hard Angle
1. (Foundation: L’Oreal True Match, N1 soft ivory. Tool: Ulta, makeup sponge)
*Apply your foundation as you normally would if you wear it. You could go a shade lighter if you wanted to emphasis the look*
Pour out a dime sized amount of product on the back of your hand. Dip the sponge into the foundation; you only want a small amount of product. Then apply to your face in pressed, short strokes, blending the foundation into your skin. You can cover only your problem areas, or your entire face. Be sure to blend under your chin and into your neck.
2. Concealer (Concealer: NYX HD Concealer, 02. Tool: Ulta, makeup sponge)
Apply concealer to any problem areas, and to your chin, the bridge of your nose, your forehead, and under your eyes and the top of your cheek bones in a triangular shape. Blend this with your sponge in pressed, short strokes.
3. Setting Powder (Setting Powder: DermaBlend, Original. Tool: Large Powder Brush)
Dip a large, fluffy powder brush into the setting powder and nock of excess by taping the brush against the edge of the container of the product. Then apply to face; where you applied foundation and concealer if you have oily skin, or only to the places you applied concealer if you have dry or combination skin. Apply more product to brush as needed.
4. Eyebrows (Eyebrow Powder: Benefit, Brow Zingas. Tool: Benefit, Hard Angle Definer)
Dip a stiff, angled brush into the brow powder. Using short, upward strokes, fill in your brows, accentuating the arch of your brow. I also suggest making them darker than normal to contrast the pale skin.
Bronzer & Highlighter

Bronzer: Physicians Formula magic mosaic light
Highlighter: Physicians Formula Mineral Glow Pearls, Translucent Pearl
Tools: Eco Tools, blush brush, fan brush & Elf, Flawless concealer brush &
1. Bronzer (Bronzer: Physicians Formula, magic mosaic light. Tool: Eco Tools, blush brush, Elf, Flawless concealer brush)
Swirl a medium sized angled or domed brush in bronzer, knocking off extra product by tapping the brush against the side of the product casing. Blend this onto your face under your cheekbones, blending slightly onto the top of your cheek bones in strokes following the angle of your cheekbones, and swirling to soften. Also apply and blend on our temples, hair line, and under your chin and on your neck. You can make this as intense as you want, it will only add to the pale and dramatic vampire look.
Then using a smaller, round, fluffy brush, bronze the sides of our nose and around your nostrils.
2. Highlighter (Highlighter: Physicians Formula, Mineral Glow Pearls Translucent Pearl. Tool: Eco tools, Fan brush)
Swirl a large, thin fan brush into a powder highlighter. Then, in the same triangle shape used for concealer, highlight under your eyes and the tops of your cheekbones. Also swipe your brush over your chin, the bridge of your nose, and your forehead.
Lips (and your Done!)
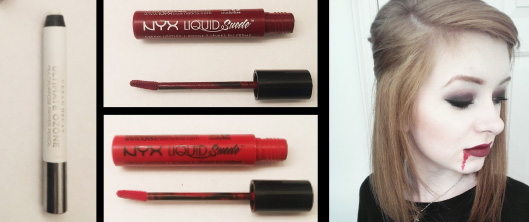
Liquid Lipstick: NYX Liquid Suede. Cherry Skies, Kitten Heels
1. Primer (Primer: Urban Decay, Ultimate Ozone)
Sweep the primer stick across your lips, paying close attention to the edge of your lips.
2. Lip Color (Liquid Lipstick: NYX, Cherry Skies)
Sweep this across your lips, allowing a base coat to set before applying a second.
3. “Blood” (Liquid Lipstick: NYX, Kitten Heels)
Dab this on the inner parts of your upper and lower lip and trail it down the sides of your mouth.
